Wednesday, December 31, 2008

A Night at the Ball


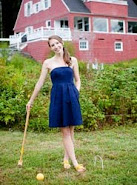
Photos from the International Debutante Ball at the Waldorf-Astoria by Beatrice de Gea for the NY Times. Read the story here and see the slideshow here.

What do you think - too much opulence in these uncertain times? It is all for charity, as they say..

Martha's Butterscotch-Pecan Cake


A few weeks ago, I attempted my first Martha Stewart layer cake, the Butterscotch-Pecan from her November 2008 Living issue. While beautiful to look at, it was intensely buttery and sugary - too much so for my audience's taste. For a relatively novice cook, it was also incredibly time-consuming and used just about every bowl in my kitchen. It was certainly an experience to make, however, so if you're looking for a recipe that will make an impact on the table, this is a great one to try.


Serves 12 to 14

Ingredients for the cakes:
--vegetable oil or cooking spray, for pans
--3 3/4 cups all-purpose flour
--1 1/4 teaspoons baking powder
--3/4 teaspoon baking soda
--2 1/2 teaspoons coarse salt
--10 ounces (2 1/2 sticks) unsalted butter, softened
--2 1/2 cups packed dark-brown sugar
--4 large eggs, room temperature
--1 tablespoon plus 1 teaspoon pure vanilla extract
--1 1/4 teaspoons rum, preferably golden or dark
--1 1/4 cups buttermilk, room temperature

Ingredients for the frosting
--12 ounces unsalted butter (3 sticks), 1 stick left whole, 2 sticks cut into small pieces, softened
--2 cups packed dark-brown sugar
--1 cup heavy cream
--1/2 teaspoon coarse salt
--20 ounces cream cheese, softened
--1/2 cup confectioner's sugar, sifted

Ingredients for the butterscotch sauce
--2/3 cup packed dark-brown sugar
--3 ounces (6 tablespoons) butter, cut into pieces
--1/2 cup light corn syrup
--1/4 teaspoon coarse salt
--1/2 cup heavy cream
--2 cups pecan halves, toasted and chopped, plus more halves for garnish


1. Make the cakes: Preheat oven to 325 F. Coat three 8-by-2-inch round cake pans with cooking spray, line with parchment, and coat parchment. Whisk flour, baking powder, baking soda, and salt in a medium bowl.

2. Beat butter and brown sugar with a mixer on medium-high speed until pale and fluffy, about 5 minutes. Beat in eggs, 1 at a time, beating well after each addition, then add vanilla and rum. Reduce speed to low. Add flour mixture in 2 additions, alternating with buttermilk. Raise speed to medium-high, and beat for 2 minutes. Divide batter among pans.

3. Bake cakes until golden brown and testers inserted in centers come out clean, about 40 minutes. Transfer pans to wire racks, and let cool slightly. Invert cakes onto racks. Let cool.

4. Make the frosting: Melt 1 stick butter in a medium saucepan over medium heat until dark golden brown, about 10 minutes. Add brown sugar, cream, and salt, stirring until sugar dissolves. Bring to a boil, whisking constantly, and cook for three minutes. Transfer to a mixer bowl, and let cool.

5. With machine running, add remaining butter, a few pieces at a time, and beat on low until incorporated. Raise speed to medium, and beat for 2 minutes. In another bowl, beat cream cheese and confectioner's sugar on medium-high until fluffy and smooth, about 3 minutes. Add brown-butter mixture to cream cheese, and beat until smooth. Cover, and refrigerate until chilled, at least 2 hours (or overnight, beating on low speed before using).

6. Make the butterscotch sauce: Mix sugar, butter, corn syrup, and salt in a small saucepan over medium heat, and cook, stirring, until sugar dissolves. Bring to a boil, and cook for 2 minutes. Remove from heat, and whisk in cream. Return to heat, and cook for 2 minutes. Let cool slightly.

7. To assemble the cake: Trim tops of 2 cake layers and top and bottom of third (this will be the middle) to create flat exposed surfaces. Brush 1/4 cup plus 2 tablespoons butterscotch sauce on cut sides. Let cool. Spread 1 cup frosting on 1 layer, then place middle layer on top, sauce side down. Spread 1 cup frosting on middle layer, then place third layer on top, sauce side down. Spread 1 cup frosting on top and sides. Refrigerate until firm, about 1 hour.

8. Using an offset spatula, spread remaining frosting on top and sides of cake. Press chopped pecans on sides, and garnish top with halves. Transfer cake to a serving plate or cake stand. Refrigerate until firm, at least 4 hours (or up to 2 days, covered).


{All photos by me}

See more of Martha's layer cakes here.

Tuesday, December 30, 2008

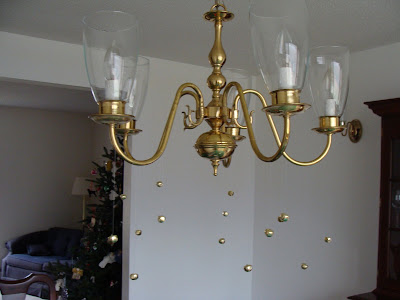
DIY Bell Chandelier


This simple project is a little late for Christmas, but I think it's appropriate as a winter decoration, as well.

Here's what you need:
-- a chandelier (ours is over the dining room table)
-- a pack of jingle bells (the ones I chose are gold - they were about $2.50 at Walmart, and I only used half of the package)
-- a spool of fishing line


Once you've assembled your supplies, you can begin hanging the bells.

Cut a length of fishing line and knot one end through the bell's loop (a single knot worked for me). Tie the other end to an arm of the chandelier with a double knot. Trim both ends of the line. Continue until the chandelier is as full of bells as you like, alternating the lengths of the strings and the size of the bells (if you have more than one size to work with). I strung three bells on each arm.

Et voila! A simple and festive winter decoration


{All photos by me - and I promise it looks better in person!}

Monday, December 29, 2008

Board No. 10: Pop the Bubbly!


{Click to enlarge!}

In honor of the upcoming ball drop, I wanted to put together a sweet and oh-so-chic board. This New Year's Eve wedding starts at 8pm. Guests kick up their heels swing dancing to a big band and feast on petite frosted donuts and monochromatic martini crudite. Blush, gold, black, and white are the colors of the evening. The bride and groom leave in a vintage getaway car at midnight after running through a sea of sparklers. The champagne flows freely {naturally}.

The Details
First row, left to right:
The Art Deco circles on the bottom of this invitation from {Hello!Lucky} kick off a night filled with bubbly {bubbly--bubbles--circles.. get it?}; your ladies will look lovely in a shimmery jacquard dress {Brides.com}; apply gold balls liberally to a staircase for a mesmerizing display (but only if no one will be walking down it!) {via The City Sage}

Second row, left to right:
Serve petite donuts and mini meringue puffs late night for a sweet end to the festivities {Brides.com}; silver flatware and gold glitter complement this board's palette {Country Living}; a tie and bout in the faintest shade of blush looks elegant on the groom {The Knot}

Third row, left to right:
Pillar candles have become a somewhat standard non-floral centerpiece option, but slender tapers grouped together are unexpected {Brides.com}; rent or borrow a vintage Chrysler for some "something old" transportation {photo by Justin Marantz}; a shiny stack of champagne makes for an elegant, if somewhat precarious, display {Brides.com};

Fourth row, left to right:
Menu scrolls add chic-on-the-cheap color to reception tables {Ceci NY via Southern Weddings}; add a sparkly rhinestone brooch to dress up plain ballet flats {photo by Jose Villa}; serve winter white crudite (cauliflower, endive, white asparagus) in martini glasses at the cocktail hour {Brides.com}

What are you doing for New Year's Eve? I'll be in NYC celebrating a friend's birthday {but NOT in Time's Square!}.

Wednesday, December 24, 2008

Happy Christmas Eve!


{Image from Martha Stewart Living}

I hope all you lovely readers are spending the holidays warm and cozy with friends and family. I know I have so much to be thankful for, and I'll bet you do, too.

Peace, love, and joy to you and yours.


{Look for a New Year's board on Monday! Posting will be spotty other than that for a week or so as we all enjoy the holidays.}

Monday, December 22, 2008

Board #9: Merry, Merry Christmas


{Click to enlarge!}

With only three days to go until Christmas, I was inspired to create this red, white, gray - and yes, green - inspiration board. I tried to keep the green to foliage and filler, which helped to alleviate my worries about it feeling too cliched. I'm really happy this board is able to feel both fun - what with the button bout, checked tie, and peppermint eggnog - and classy (calligraphy, cake). What do you think? Too Christmas-y for a wedding? Or could it work?

One more thing: this board was originally inspired by last week's Table Trends post on Once Wed. This series has been brilliant - if you haven't yet, definitely check it out! And once this board started coming together, I couldn't resist including a photo Kathryn used in a fabulous board a week or so ago; it was just too perfect. Both of these ladies and their lovely work are so inspiring to me - you must add their blogs to your list of daily must-reads!

The Details
First row, left to right:
A button boutonniere adds an offbeat note to even the most formal wedding (Once Wed); make sure your photographer grabs a fabulous ring shot (this one by James Christianson); evergreen-filled window boxes look darling from the outside of your venue - or bring them inside as centerpieces perfect for long tables (Martha Stewart via Snippet & Ink)

Second row, left to right:
Peppermint eggnog is a delicious and seasonal cocktail hour offering (Martha Stewart Kids); red shoes add a pop of color to a wedding day ensemble - if you're not comfortable flashing them at the ceremony, change into a pair just for the reception (by Orchard Cove Photography via the Style Me Pretty Little Black Book Blog); shapely curves and sugar twigs set off this otherwise classic white cake (Brides.com)

Third row, left to right:
Poinsettias in simple pails would also make lovely centerpieces, especially at smaller cocktail hour tables (Jupiter Images); you may miss the warmth of a summer wedding in December, but falling snow makes its own brand of magic (photo by James Christianson via the Little Black Book Blog); a checked tie in cheery colors is the perfect complement to a gray suit (The Knot)

Fourth row, left to right:
Your bridesmaids will almost certainly rewear a kicky red-and-white-striped cocktail number (via Snippet & Ink); oversized white roses and red berries mingle happily in another option for centerpieces (Once Wed); red-on-white calligraphy sets a festive tone from the start (Laura Hooper)

Catch up on the first three holiday-themed installments here:
Pinecones & Chocolate
Blue Christmas
Elegant Evergreens

Friday, December 19, 2008

Happy Weekend!


{Photo by Nicole Hill Gerulat}

It's going to be a snowy one here in the Northeast. Stay warm, and check back on Monday for a very merry inspiration board!

Thursday, December 18, 2008

Last Minute Gift Idea!


Bon Appetit {$10 for 1 year/12 issues}
Domino {$5 for 1 year/10 issues}
Vogue {$13 for 1 year/12 issues}
Better Homes & Gardens {$9.97 for 1 year/12 issues}

Thanks to Rachel and Amazon's amazing sale, I hopped online last night and bought myself a Domino subscription {for $5 -- incredible!}. Magazine subscriptions make perfect last minute gifts - just order online, then pick up the most recent copy at the store to give to the lucky recipient! Done and done.


{Image from Domino}

Molten Chocolate Babycakes


{Photo from hannahliesje's Flickr photostream}

You already know I love Nigella, and her babycakes are another can't-miss recipe. As proof, I offer our experience making them last night: because we were "cooking by committee," the mini crocks went ungreased and the oven was somehow set for 200 F instead of 400 F (as the recipe calls for). Despite this, they still came out delicious!

These are also perfect to make for a dinner party, as you can fill the crocks beforehand then refrigerate them until you're ready for dessert. Make sure you have some vanilla ice cream on hand to cut the intense chocolate-ness, however, as these are not for the faint of heart.

Time: 25 minutes

1/4 cup unsalted butter, softened, plus more for greasing
12 ounces bittersweet chocolate
1/2 cup sugar
4 large eggs, beaten with a pinch of salt
1 tsp. vanilla extract
1/3 cup all-purpose flour
6 individual 6-ounce custard cups/mini baking crocks

Preheat the oven to 400 and put in a baking sheet at the same time. Lay 3 of the crocks on a sheet of doubled wax or parchment paper. Draw around them, remove, and then cut out the discs as marked. Press them into the base of the buttered crocks.

Melt the chocolate and let it cool slightly. Cream together the butter and sugar, and gradually beat in the eggs and salt, then the vanilla. Then add the flour until smooth and scrape in cooled chocolate, blending until smooth again.

Divide the batter between the 6 cups and place on the baking sheet that's already in the oven (it's best to remove the sheet briefly for this step). Bake for 10-12 minutes. As soon as you take them out of the oven, tip the babycakes onto small plates, add a scoop of vanilla ice cream, and serve.

Serves 6, but they're so rich they could easily be shared.

Tuesday, December 16, 2008

Going to the Ballet

Or rather, I went to the ballet. The Boston Ballet's Nutcracker, to be exact. Last weekend. And oh, it was magical. As someone who danced in the Nutcracker for ten years or so, experiencing it from the audience side always, even now, releases a flood of complicated emotions. We had seats five rows back from the stage, however, which is close enough to see the sweat... I don't know if this made things better or worse.


Dreamy, dreamy photos by Rachel Papo from a New York City Ballet Nutcracker fitting. Thanks, Rachel!

Monday, December 15, 2008

Board #8: Elegant Evergreens


{Click to enlarge!}

Welcome back to the third week of our holiday-inspired boards! To me, this deep, mossy green is perfect for an elegant December party - or wedding! Mix in shades of cream and white, layer on textures in a knitted ring pillow, satin beribboned favors, and velvety poinsettia leaf place setttings, and you're ready to throw a swanky soiree.

The Details
First row, left to right:
The tree is the perfect focal point for our color palette: evergreen branches hung with creamy stars and balls (Better Homes & Gardens); serve individual coconut souffles for dessert (Martha Stewart Weddings); a bay leaf garland makes for a fragment aisle decoration (via Southern Weddings)

Second row, left to right:
Shortbread cookies punched with stars and piled on a generous serving platter make a perfect late-night snack (Country Living); a cream satin clutch is a generous and thoughtful gift for your maids (Brides.com); dendrobium orchids and white lisianthus give this bouquet plenty of oomph (Brides.com)

Third row, left to right:
I think the moss wreath in this front door display is so fresh - and easily adaptable to a church or reception location (Martha Stewart Living); I love this short, cream dress on a daring bride (Martha via Snippet & Ink); oversize poinsettia blooms make for chic napkin rings (Better Homes & Gardens)

Fourth row, left to right:
A knit ring pillow is a relatively easy DIY project (juicyyumberger's Flickr stream via Snippet & Ink); wrap up favors in green paper and satin ribbons for a shot of color on tables (Jupiter Image); mix in multiple tones with fir and green apple centerpieces (Better Homes & Gardens)

For more, check out the first two installments here:
Blue Christmas
Pinecones and Chocolate

Friday, December 12, 2008

Happy Friday!


{Click to enlarge!}

See more from this stunning wedding (photographed by Jose Villa) on his blog. And have a wonderful weekend!

Put your stamp on it

Last summer, I fell in love with the idea of the color-coordinated stamp sets from Etsy seller TheLittleChickenCoop. I immediately bought these three packages:


Now, a few month later, I still don't know what to do with them. They are certainly lovely to look at, and I think their loveliness is actually holding me back - I want to make sure they go towards a project that's worthy of them!

So my question for my readers is this: do you have any lovely stamp-based projects I could tackle? My only lead so far is this gorgeous project by Miss Cream Puff (aka Stinkerpants):


See her instructions here.

I don't think I have quite a large enough collection for this one, yet, but I'd love to hear your ideas!

Tuesday, December 9, 2008

Inspiration Board #7: Blue Christmas


{Click to enlarge!}

So sorry for the scant posting, and for getting this board up a day later than promised! Exams have taken and will take precedence over blogging this week {as I suppose they should}. Anyway, this board has me singing a little Elvis: it's elegant and sleek, but not too cool to make time for some playful portraits in the snow!

The Details
First row, left to right:
Jordan almonds look new packaged in fun netting (Martha Stewart Weddings); a cardigan is a smart (and smart looking!) way to stay warm at the ceremony or reception (photo by Ann Hamilton via The Bride's Cafe); a coconut-dusted cake calls to mind snow falling outside (Rebecca Thuss)

Second row, left to right:
Silver dresses serve as moving decor {is is bad to think of them in that way?!} and add shine to the festivities (J. Crew); a twilight ceremony is a lovely and atmospheric way to begin the evening (photo by Jef Maion via Snippet & Ink); give guests a jingle bell to ring on your way back down the aisle or out the church doors (Martha Stewart Weddings)

Third row, left to right:
Icy blue letterpress delivers a crisp first impression (by Lilah Paper via Style Me Pretty); lilacs, usually associated with spring, make for a frothy, winter white bouquet (Martha Stewart Weddings); mini tart pans filled with cookies are delicious favors and add to a beautiful tablescape (Martha Stewart Weddings)

Fourth row, left to right:
A columned atrium makes for a grand reception location (The Knot); set aside ample time for playful portraits {and making snow angels!} (Anne Ruthman via Weddingbee PRO); a wedding dress with a silver sash picks up the hue of the maids' dresses perfectly (photo by Jonathan Canlas)

Friday, December 5, 2008

Happy Friday!


{photo by Melissa Schollaert via Snippet & Ink}

Have a wonderful weekend! I'll see you back here on Monday for another holiday-inspired inspiration board.

Thursday, December 4, 2008

Beach Dwelling

Some more great finds from Beach Dwelling:


sea urchin votives


bag made from reclaimed sail


over-sized wood and metal lantern


jute door stop


tote bag file folders


plump cream daybed

Ruffle Cake Stand


You may have noticed by now that I'm a fan of cake stands.

Well, I happen to be in love with this particular beauty. Have been for quite some time, now. Maybe one day someone will buy it for me and we can live happily ever after, sharing cake, or brie, or grapes, or after dinner mints.

Le sigh.

Want to buy one for yourself? Try Beach Dwelling.

Wednesday, December 3, 2008

This Just In...

Two exciting new ventures announced yesterday:


From Weddingbee founder Bee Kim:

"Vendors have so much expertise and inspiration to share, as well as some of the most gorgeous blogs out there. We thought that maybe it was time to start a new blog with blog posts by weddding vendors. And so was born WeddingbeePRO.com! Now you’ll be able to read the the same sort of behind-the-scene insights that you’ve come to expect from our Weddingbee Bees… but from our Vendor Pros!"

Check it out here.

And from Jordan of Oh Happy Day and Karisa Winkel, graphic designer extraordinaire, Stuck Label Company.


My favorite is the small red square label - perfect for Christmas presents, which, coincidentally, is just how they've styled them. So smart, these ladies! They'll be posting new designs all week, so be sure to check back.

Tuesday, December 2, 2008

Displaying Holiday Cards

It's now officially December, which means you could conceivably start receiving holiday cards any day now. How exciting! I found a few ideas for corralling the chaos when I went in search of ideas to spruce up my displays this year.

First up: simple ribbon bands can easily be expanded to accommodate a growing collection.


{Real Simple}

Over-sized bows make a splash on a blank wall or door.


{Martha Stewart Living}

A clothesline-style display holds folded cards nicely. Flat cards can be punched and strung or hung with mini clothespins. Use yarn, ribbon, or twine to suit your decor.


{Apartment Therapy}

Martha and Better Homes & Gardens both suggest a card tree, which is great for showcasing exceptionally beautiful cards (tuck the tacky ones in the back!).


{via Design Mom; instructions at Martha Stewart Living}


{Martha Stewart Living}


{Better Homes & Gardens}

Instead of the usual lights, punch a hole in card corners and string them as garland decoration.


{Martha Stewart Living}

And my personal favorite:


{via Black*Eiffel}

One important (if not a bit obvious) detail to remember: the reason these displays look so great is because the homeowners (or stylists!) were judicious in their selection of cards for display, so if you're concerned about such things, be sure to choose similarly colored designs for your groupings.